This tutorial is absolutely for beginner which contains demo source code, wordy explanation. At the end, you will be able to write up a WordPress Plugin that can load data from custom database table and serve it as data source. If you learn faster by reading source code, please feel free to jump in to my github repository.
In this article, I am going to cover below topics
- WordPress custom database table
- Enqueue or load required scripts (js)
- Textbox autocomplete

Getting started
Before we deep dive into detail, here is couple of things that we need to do
- Create a folder in “\wp-content\plugins\” called “ajax-autocomplete”
- Create “ajax-autocomplete.php” inside above folder, this file should have below header. Check out this official document for more options
/*
* Plugin Name: Ajax Autocomplete
* Plugin URI: https://www.vndeveloper.com/
* Description: DEMO WordPress Ajax jQuery textbox autocomplete, data source from custom table.
* Version: 0.1
* Author: Hien D. Nguyen
* Author URI: https://www.vndeveloper.com/
* License: GPL2+
*/ - I recommend below file folder structure. If you already have your style, keep using it.
WordPress custom database table
We will create a custom table name “testing_table” and insert some test data upon Plugin activation
register_activation_hook(basename(dirname(__FILE__)) . ‘/’ . basename( __FILE__ ), ‘activate’);
function activate() {
global $wpdb;
$charset_collate = $wpdb->get_charset_collate();
require_once(ABSPATH . ‘wp-admin/includes/upgrade.php’);$table = $wpdb->prefix . ‘testing_table’;
$query = “CREATE TABLE IF NOT EXISTS {$table} (
id INT NOT NULL AUTO_INCREMENT,
name VARCHAR(128),
PRIMARY KEY (id)
)$charset_collate;”;
dbDelta($query);$wpdb->insert($table, array(‘name’=>’LogiTech’));
$wpdb->insert($table, array(‘name’=>’Apple’));
$wpdb->insert($table, array(‘name’=>’Dell’));
$wpdb->insert($table, array(‘name’=>’Google’));
}
Enqueue or load required scripts (js)
You might know that AutoComplete needs jQuery. You also might think that you need to download jQuery libraries and place it in your plugin, then enqueue it.
For demo purpose, we don’t have any specific requirement for jQuery version. Therefore, we are going to use “built-in” jQuery that shipped along with WordPress. You can also check out all built-in scripts or libraries such as backbone, jquery-effects-transfer…at here.
add_action(‘wp_enqueue_scripts’, ‘mysite_js’);
function mysite_js() {
$wp_scripts = wp_scripts();
wp_enqueue_script(‘mysitejs’, plugins_url(‘/assets/js/frontend.js’, __FILE__), array(‘jquery’, ‘jquery-ui-core’, ‘jquery-ui-autocomplete’));
wp_localize_script(‘mysitejs’, ‘ajax_object’, array(‘ajax_url’ => admin_url( ‘admin-ajax.php’)));// Autocomplete style
wp_enqueue_style(‘plugin_name-admin-ui-css’,’http://ajax.googleapis.com/ajax/libs/jqueryui/’ . $wp_scripts->registered[‘jquery-ui-core’]->ver . ‘/themes/flick/jquery-ui.css’);// If your plugin needs its own style
wp_register_style(‘mysitecss’, plugins_url(‘/assets/css/frontend.css’, __FILE__));
wp_enqueue_style(‘mysitecss’ );
}
Keep in mind that we’ll need to send ajax request to query data from custom database table (testing_table). That’s why we need to call wp_localize_script so that our script (JavaScript) can understand variable “ajax_url”. Basically, to send an ajax request, we send a POST request to “wp-admin/admin-ajax.php”. I personally find this article perfectly explains Ajax as well as how it handles data submission.
We also load “themes/flick/jquery-ui.css” for styling our textbox autocomplete. You can check out other styles at here.
Textbox autocomplete
First thing first, we need a textbox. In this tutorial, we’ll use shortcode called “test-form” so later on we can place it in any page or post or even widget.
add_shortcode(‘test-form’, ‘test_form’);
function test_form($args, $content=”){
ob_start();
include(plugin_dir_path(__FILE__) . ‘includes/forms/test-form.php’);
return ob_get_clean();
}
In our “test-form.php”, just create a form with a textbox with “name” attribute as “testing”. In our JavaScript, we can make use of this attribute to locate this target textbox.
<form >
<input type=”text” name=”testing”>
</form>
In our loaded script (“/assets/js/frontend.js”), it looks this
jQuery(document).ready(function($) {
$(‘input[name=testing]’).autocomplete({
source: function(request, response){
$.ajax({
type: “POST”,
url: ajax_object.ajax_url,
data: {
action: ‘myautocomplete’,
keyword: $(‘input[name=testing]’).val(),
},
success:function(data) {
console.log(data);
response(JSON.parse( data ));
},
error: function(errorThrown){
console.log(errorThrown);
}
})
},
});
})
For further options, please check out this article. Whenever user types in, an ajax request will be sent to (url: ajax_object.ajax_url) which is “wp-admin/admin-ajax.php”, then callback action “myautocomplete” will handle this request and send a response.
add_action(‘wp_ajax_nopriv_myautocomplete’, ‘ajax_autocomplete’);
add_action(‘wp_ajax_myautocomplete’, ‘ajax_autocomplete’);
function ajax_autocomplete() {
global $wpdb;
$table = $wpdb->prefix . ‘testing_table’;
$results = $wpdb->get_results(“SELECT name FROM ” . $table . ” WHERE name LIKE ‘%” . $_POST[‘keyword’] . “%’”);
$items = array();
if ( !empty( $results) ) {
foreach ( $results as $result ) {
$items[] = $result->name;
}
}
echo json_encode($items);
die();
}
Final thought
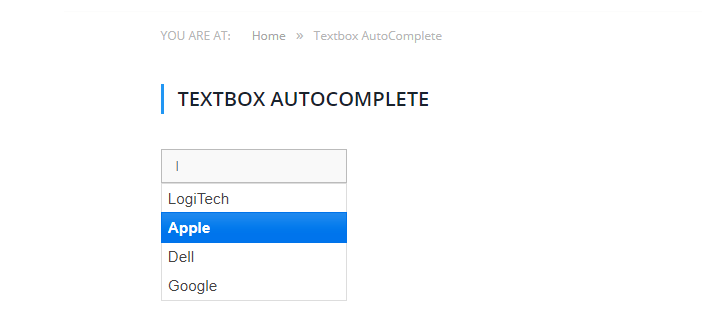
That’s it. We finished creating a WordPress Plugin that has a “testing-form” short-code. This short-code contains a form with single textbox. When user types in “l”, this textbox will load data from custom table and suggest possible value.
Technical side, we covered
- Creating custom table upon WordPress Plugin activation, also add some testing data
- Load built-in jQuery and custom scripts, styles
- Using Ajax/jQuery for textbox autocomplete
Please share if you find this tutorial helpful and don’t forget to leave a comment.